
The website you’re reading right now is served from my homeserver - an old laptop sitting in my home, running Ubuntu Server, behind my ISP’s router. Zero monthly hosting costs. Complete control. Production-grade security.
When I first thought about self-hosting, I assumed I needed:
- Expensive server hardware
- A static IP address (costs extra)
- Complex networking knowledge
- Constant monitoring
- High electricity bills
I was wrong. With the right approach, an old laptop becomes a powerful, secure, cost-free hosting platform.
This guide will teach you:
- How to transform unused hardware into a production server
- Security best practices that prevent the common homeserver nightmares
- Network configuration for reliability (DHCP reservations)
- Private access architecture (Tailscale for your eyes only)
- Public access architecture (Cloudflare Tunnel for website visitors)
- Docker containerization for clean service management
- Bonus: Jellyfin media server and Samba file sharing
By the end, you’ll have a complete, production-ready homeserver setup that rivals commercial hosting (Haha just joking).
Real talk: The site you’re on is living proof this works.
What You’ll Learn🔗
This comprehensive guide teaches production-level system administration:
- Linux server management: Ubuntu Server installation, systemd services, security hardening
- Network fundamentals: DHCP reservations, private networking, NAT traversal
- Modern security architecture: Zero-trust networking, encrypted tunnels, firewall configuration
- Service deployment: Direct installation and containerization strategies
- Infrastructure practices: Configuration management, monitoring, and automation
- Real-world troubleshooting: Log analysis, debugging, and maintenance
You’ll build a functional platform for hosting websites, development environments, and personal services - all without monthly hosting fees.
Note: The $0 homeserver is only possible if you have old hardware (laptop or desktop) already available. We’re repurposing existing equipment, not purchasing new hardware.

The Philosophy: Smart, Not Expensive🔗
This isn’t about building a datacenter. It’s about:
- Reusing hardware: That old laptop or desktop is more powerful than servers from 10 years ago
- Security through architecture: Zero open ports, encrypted access, minimal attack surface
- Learning by doing: Hands-on experience with Linux, networking, and services
- Ownership: Your data, your rules
Setup costs:
- Hardware: $0 (reusing old laptop/desktop)
- Hosting: $0 (self-hosted)
- Domain: ~15-$20/year (optional, only for public website)
Total: Less than one month of basic VPS hosting.
Overview: The Complete Architecture🔗
Before diving into implementation, let’s see the big picture:

Two access patterns:
- Public (Cloudflare Tunnel): Website accessible to anyone, no open ports
- Private (Tailscale): SSH and admin access only for you, encrypted
Zero open ports on your router. All connections are outbound from your server.
Step 1: Hardware Selection and Preparation🔗
What You Need🔗
If you have an old laptop or desktop with a CPU, RAM, and Ethernet port collecting dust, you can repurpose it as a homeserver:
- Any functional CPU (dual-core or better recommended)
- 2GB+ RAM
- 128GB+ storage
- Ethernet port
My setup: Intel Pentium processor with 2GB RAM. If you have more, consider yourself lucky! But even with minimal specs, you can run a functional homeserver.

Pro tip: Run
neofetchon your machine to see your specs in a clean format!
Physical Setup🔗
- Clean the hardware: Dust out fans, ensure proper cooling
- Ethernet connection: Wire to router (more reliable than WiFi)
- Ventilation: Ensure adequate airflow
- Accessible location: You might need physical access occasionally
Step 2: Ubuntu Server Installation🔗
Why Ubuntu Server?🔗
- Lightweight: No GUI, minimal resources
- Stable: LTS releases supported for 5 years
- Popular: Huge community, tons of documentation
- Professional: Powers most of the internet’s servers
Download and Create Installation Media🔗
-
Download Ubuntu Server LTS:
- Visit: https://ubuntu.com/download/server
- Get the latest LTS (24.04 LTS as of writing)
-
Create bootable USB:
On Windows (Rufus - Recommended):
- Download Rufus from https://rufus.ie
- Insert USB drive (8GB+ recommended)
- Open Rufus and configure:
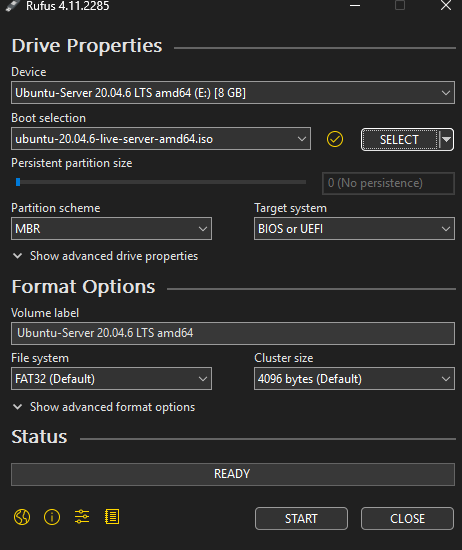
Rufus Settings:
- Device: Select your USB drive
- Boot selection: Click “SELECT” and choose your downloaded Ubuntu Server ISO
- Partition scheme: GPT (for modern UEFI systems) or MBR (for older BIOS systems)
- Target system: UEFI (non-CSM) for GPT, or BIOS (or UEFI-CSM) for MBR
- File system: FAT32 (default, required for bootable USB)
- Cluster size: Default (32 KB)
GPT vs MBR - Which to Choose?
-
GPT (GUID Partition Table): Use for modern computers (2010+)
- Supports drives larger than 2TB
- Required for UEFI firmware
- More robust (backup partition table)
- Choose this if unsure - most modern laptops use UEFI
-
MBR (Master Boot Record): Use for older computers (pre-2010)
- Legacy BIOS systems only
- Limited to 2TB drives
- Simpler but less reliable
- Only choose if your laptop is very old
How to check your system:
- Most modern laptops (2010+) = GPT/UEFI
- If you see “UEFI” in BIOS settings = GPT
- If you see only “Legacy” or “BIOS” = MBR
- Click START (all data on USB will be erased)
- Wait for completion (5-10 minutes)
On Linux:
sudo dd if=ubuntu-24.04-live-server-amd64.iso of=/dev/sdX bs=4M status=progress && syncOn macOS:
Use balenaEtcher (https://www.balena.io/etcher/) - it handles GPT/MBR automatically
Installation Process🔗
Boot from USB and follow the installer:

Critical choices:
- Network: Use Ethernet, configure for DHCP (we’ll set reservation later)
- Storage: Use entire disk (GPT partition table, ext4 filesystem)
- Profile:
- Your name: (your name)
- Server name:
homeserver(or whatever you prefer) - Username: Your preferred username
- Password: Strong password
- SSH: MUST enable OpenSSH server (for remote access)
Installation takes 10-15 minutes.
First Boot🔗
After reboot, remove USB and login:
homeserver login: yourusername
Password: [your password]

Welcome to Ubuntu 24.04 LTS (GNU/Linux 6.x.x-generic x86_64)
Step 3: Initial System Configuration🔗
Update System🔗
# Update package lists
sudo apt update

# Upgrade all packages
sudo apt upgrade -y

# Reboot if kernel was updated
sudo reboot
Configure Lid Behavior (Important for Laptops!)🔗
By default, closing the lid might sleep/suspend the laptop. We need it to stay running:
# Edit logind.conf
sudo vi /etc/systemd/logind.conf
Find and modify these lines (remove # if commented):
HandleLidSwitch=ignore
HandleLidSwitchExternalPower=ignore
HandleLidSwitchDocked=ignore
Save (press Esc, type :wq, press Enter), then apply:
sudo systemctl restart systemd-logind
Now you can close the lid and the server keeps running.
Install Essential Tools🔗
sudo apt install -y \
    curl \
    wget \
    git \
    htop \
    net-tools \
    ufw \
    sshguard
Step 4: Security Hardening🔗
SSH Configuration (Critical)🔗
Important decision point: How do you plan to access your server remotely?
Option 1: Tailscale (Recommended - What I Use)
- Secure, encrypted access from anywhere
- Zero configuration needed for SSH
- No public exposure to port scanners and bots
- Skip the port changes and DuckDNS setup below
Option 2: Public DNS with DuckDNS
- Expose SSH to the internet via port forwarding
- Free dynamic DNS service
- Warning: Constant port scanning and bot attacks
- Requires additional hardening (see DuckDNS setup guide)
My experience: I initially tried DuckDNS with public SSH access. The constant bombardment from bots and port scanners was overwhelming. I switched to Tailscale and never looked back - zero stress, maximum security.
If you’re using Tailscale (Step 7), you can keep SSH on the default port 22 since it’s only accessible via your private Tailscale network.
SSH Hardening🔗
# Backup original config
sudo cp /etc/ssh/sshd_config /etc/ssh/sshd_config.backup

# Edit SSH config
sudo vi /etc/ssh/sshd_config
Recommended settings:
# Change SSH port (optional but recommended if using DuckDNS)
# NOT needed if only using Tailscale
Port 22  # Keep default if only using Tailscale

# Disable root login
PermitRootLogin no

# Enable public key authentication (more secure)
PubkeyAuthentication yes

# Disable password authentication (after setting up SSH keys)
PasswordAuthentication no

# Disable empty passwords
PermitEmptyPasswords no

# Limit authentication attempts
MaxAuthTries 3

# Disconnect idle sessions
ClientAliveInterval 300
ClientAliveCountMax 2
Setup SSH Key-Based Authentication🔗
Before disabling password authentication, set up SSH keys:
On your local machine:
# Generate SSH key pair (if you don't have one)
ssh-keygen -t ed25519 -C "[email protected]"

# Copy public key to server
ssh-copy-id yourusername@homeserver
Test the connection:
ssh yourusername@homeserver
If key-based auth works, you can now disable password authentication by uncommenting PasswordAuthentication no in the SSH config.
Restart SSH:
sudo systemctl restart sshd
Important: If you change the port, remember it for SSH connections:
ssh -p 2222 user@homeserver # If you changed to port 2222
Firewall (UFW)🔗
# Enable firewall
sudo ufw enable

# Allow SSH (adjust port if you changed it)
sudo ufw allow 22/tcp

# Check status
sudo ufw status
Note: We won’t open 80/443 because we’re using Cloudflare Tunnel (outbound only). If you plan to expose your server to the public internet, ensure UFW is properly configured.
SSHGuard (Brute Force Protection)🔗
SSHGuard monitors logs and blocks attackers automatically:
# Install SSHGuard
sudo apt install sshguard -y

# Enable and start the service
sudo systemctl enable sshguard
sudo systemctl start sshguard

# Check status
sudo systemctl status sshguard

# View blocked IPs
sudo iptables -L sshguard --line-numbers
SSHGuard works automatically - no configuration needed. It monitors auth logs and blocks IPs after repeated failed attempts.
Important: Use UFW and SSHGuard if you’re planning to use your server on the public internet for enhanced security.
Step 5: Network Configuration - DHCP Reservation🔗
Your homeserver needs a stable IP address on your local network. DHCP reservation ensures it always gets the same IP.
Learn more about DHCP: Check out DHCP Explained: How Networks Assign IP Addresses Automatically for a deep dive into how DHCP works, lease times, and reservations.
Find Your Server’s MAC Address🔗
ip link show

# Look for your Ethernet interface (usually eth0, enp0s25, or similar)
# Example output:
# 2: enp0s25: <BROADCAST,MULTICAST,UP,LOWER_UP>
#    link/ether aa:bb:cc:dd:ee:ff
Note the MAC address: aa:bb:cc:dd:ee:ff
Find Your Current IP🔗
ip addr show | grep inet

# Example output:
# inet 192.168.1.142/24 brd 192.168.1.255 scope global dynamic enp0s25
Current IP: 192.168.1.142
Configure DHCP Reservation on Router🔗
-
Find your router’s IP (default gateway):
ip route | grep default

# Example output:
# default via 192.168.1.1 dev enp0s25 proto dhcp metric 100
Your router IP is the address after “via” - in this example:
192.168.1.1 -
Access router admin panel:
- Open browser and go to:
http://192.168.1.1(use your router’s IP from above) - Login with admin credentials
- Open browser and go to:
-
Find DHCP settings:
- Look for “DHCP Reservation”, “Static Lease”, or “IP Reservation”
-
Create reservation:
- MAC Address:
aa:bb:cc:dd:ee:ff - IP Address:
192.168.1.50(choose a static IP outside your DHCP pool but in the same subnet) - Hostname:
homeserver
- MAC Address:
-
Save and reboot server:
sudo reboot -
Verify new IP:
ip addr show | grep inet
# Should show: 192.168.1.50
Why this matters: Your server now has a predictable IP that won’t change. Essential for Tailscale, Cloudflare Tunnel, and internal services.
Understanding network addressing: Learn about Public vs Private Networks to understand why your homeserver uses a private IP (192.168.x.x) on your local network while Cloudflare routes public traffic to it.
Step 6: Docker Installation🔗
Docker provides clean containerization - each service runs isolated with its own dependencies.
Install Docker🔗
# Install prerequisites
sudo apt install apt-transport-https ca-certificates curl software-properties-common -y

# Add Docker GPG key
curl -fsSL https://download.docker.com/linux/ubuntu/gpg | sudo gpg --dearmor -o /usr/share/keyrings/docker-archive-keyring.gpg

# Add Docker repository
echo "deb [arch=$(dpkg --print-architecture) signed-by=/usr/share/keyrings/docker-archive-keyring.gpg] https://download.docker.com/linux/ubuntu $(lsb_release -cs) stable" | sudo tee /etc/apt/sources.list.d/docker.list > /dev/null

# Update and install
sudo apt update
sudo apt install docker-ce docker-ce-cli containerd.io docker-compose-plugin -y

# Add your user to docker group (avoid sudo for docker commands)
sudo usermod -aG docker $USER

# Logout and login for group changes to take effect
exit
Login again, then verify:
docker --version
# Docker version 24.x.x

docker compose version
# Docker Compose version v2.x.x

# Test
docker run hello-world
Docker Resource Limits (For Low-Spec Machines)🔗
If you’re running on limited RAM (like my 2GB setup), you’ll want to limit container resource usage:
# Run container with CPU and memory limits
docker run -d \
  --name website \
  --memory="256m" \
  --memory-swap="512m" \
  --cpus="0.5" \
  --restart unless-stopped \
  -v ~/website:/usr/share/nginx/html:ro \
  -p 8080:80 \
  nginx:alpine
Resource limits explained:
--memory="256m"- Container can use maximum 256MB RAM--memory-swap="512m"- Total memory + swap limit--cpus="0.5"- Container can use 50% of one CPU core
Monitor container resources:
docker stats # Real-time resource usage
Scaling Up: Proxmox Virtualization🔗
If you’re blessed with more powerful hardware (8GB+ RAM, multi-core CPU, larger storage), consider Proxmox for virtualization:
- Run multiple VMs/containers on one machine
- Better resource isolation
- Web-based management
- Snapshots and backups
- Learning enterprise-level virtualization
Example Proxmox setup:
- VM 1: Ubuntu Server (homeserver)
- VM 2: Pi-hole (DNS/ad-blocking)
- VM 3: Testing/development environment
- LXC containers for lightweight services
This is a topic for a future deep-dive. For now, direct installation works perfectly for single-purpose homeservers.
Step 7: Tailscale Setup (Private Access)🔗
Do You Need Tailscale?🔗
Use Tailscale if:
- ✅ You want to access your homeserver from anywhere (coffee shop, work, travel)
- ✅ You need secure SSH access without exposing ports publicly
- ✅ You want to access services (Jellyfin, admin panels) remotely
- ✅ You have multiple locations (home, office) and want seamless connectivity
Skip Tailscale if:
- ❌ You only access your server from your home network
- ❌ All your usage is local (media streaming, file sharing within home)
- ❌ You never leave home or don’t need remote access
My use case: I access my homeserver from anywhere - Check services while traveling, manage everything remotely. Tailscale is essential for this workflow.
Tailscale Architecture🔗

How it works:
- Both devices connect outbound to Tailscale coordination server (no open ports)
- Coordination server helps devices discover each other
- Direct peer-to-peer encrypted tunnel established using WireGuard
- All traffic flows through encrypted tunnel - SSH, HTTP, everything
- Your router sees normal outbound traffic - no special configuration needed
Key points:
tailscaleddaemon runs on port 41641 (UDP, outbound only)- No ports opened on your router
- NAT traversal happens automatically
- End-to-end encrypted (your laptop ↔ homeserver directly)
Tailscale provides secure remote access without exposing SSH publicly.
For detailed setup instructions, refer to the official Tailscale installation guide.
Install Tailscale🔗
# Official installation script
curl -fsSL https://tailscale.com/install.sh | sh
Configure and Start🔗
# Start Tailscale
sudo tailscale up

# Output will show a URL like:
# To authenticate, visit:
# https://login.tailscale.com/a/abc123def456
- Open URL on your personal computer
- Authenticate with Google/Microsoft/GitHub
- Approve the device in Tailscale admin console
Verify Connection🔗
# Check status
tailscale status

# Output shows your tailnet:
# 100.x.y.z   homeserver    user@  linux   -
Test from Your Laptop🔗
On your personal laptop (with Tailscale installed):
# SSH via Tailscale
ssh user@homeserver

# Or use the Tailscale IP
ssh [email protected]
Magic: Works from anywhere (home, coffee shop, mobile) without open ports or VPN configuration.
Enable MagicDNS (Optional but Recommended)🔗
In Tailscale admin console:
- Go to DNS settings
- Enable MagicDNS
- Now you can use
ssh user@homeserverinstead of remembering IPs

Step 8: Cloudflare Tunnel Setup (Public Access)🔗
How Cloudflare Tunnel Works🔗
Traditional web hosting requires open ports (80/443) exposed to the internet. Cloudflare Tunnel reverses this - your server initiates an outbound connection to Cloudflare, and they route public traffic through that tunnel.
Cloudflare Tunnel Architecture🔗

How it works:
cloudflareddaemon runs on your homeserver- Establishes outbound HTTPS connection to Cloudflare (port 443)
- Connection stays open (persistent tunnel)
- When user visits your domain, request hits Cloudflare Edge
- Cloudflare routes request through the tunnel to your homeserver
cloudflaredforwards to local service (localhost:8080)- Response flows back through tunnel to Cloudflare to user
Key points:
cloudflareddaemon connects outbound on port 443 (HTTPS)- Zero inbound connections - your router sees only outbound traffic
- Ports 80/443 remain closed on your router
- Cloudflare provides SSL certificates automatically
- DDoS attacks are absorbed by Cloudflare, never reach your home
- Works behind CGNAT (Carrier-Grade NAT) - no public IP needed
Cloudflare Tunnel Daemon Flow🔗

Detailed Flow:
Initial Setup:
cloudflareddaemon starts on your homeserver- Connects outbound to Cloudflare (HTTPS port 443)
- Authenticates using credentials (JSON file)
- Maintains persistent connection (heartbeat every 30 seconds)
When User Visits Your Site:
- User types
yourdomain.comin browser - DNS resolves to Cloudflare IP (not your home IP)
- Request hits Cloudflare Edge server (closest to user)
- Cloudflare checks cache, applies security rules
- Forwards request through established tunnel to
cloudflared cloudflaredproxies to localhost:8080 (your Docker container)- Response flows back through tunnel → Cloudflare → User
Security Benefits:
- Your home IP address is never exposed
- No inbound ports = no attack surface
- Cloudflare blocks malicious traffic before it reaches tunnel
- Even if tunnel credentials leaked, attacker can’t reach your home (outbound only)
Why this matters:
- ✅ Zero open ports on your router
- ✅ DDoS protection (Cloudflare absorbs attacks)
- ✅ Free SSL certificates
- ✅ CDN caching for faster load times
- ✅ Works behind CGNAT (Carrier-Grade NAT)
Cloudflare Tunnel exposes your website publicly without open ports.
For detailed setup instructions, refer to the official Cloudflare Tunnel documentation.
Prerequisites🔗
- A domain name (e.g.,
yourdomain.com) - ~15-$20/year - Cloudflare account (free)
- Domain nameservers pointed to Cloudflare
Install cloudflared🔗
# Download cloudflared
wget https://github.com/cloudflare/cloudflared/releases/latest/download/cloudflared-linux-amd64.deb

# Install
sudo dpkg -i cloudflared-linux-amd64.deb

# Verify
cloudflared --version
Authenticate and Create Tunnel🔗
# Login (opens browser)
cloudflared tunnel login

# Create tunnel
cloudflared tunnel create homeserver-tunnel

# Output:
# Created tunnel homeserver-tunnel with id abc-123-def-456
# Credentials written to: /root/.cloudflared/abc-123-def-456.json
Note the tunnel ID: abc-123-def-456
Configure DNS🔗
# Route your domain to the tunnel
cloudflared tunnel route dns homeserver-tunnel yourdomain.com

# For subdomain:
cloudflared tunnel route dns homeserver-tunnel blog.yourdomain.com
Create Configuration🔗
# Create directory
mkdir -p ~/.cloudflared

# Create config
nano ~/.cloudflared/config.yml
Configuration example:
tunnel: abc-123-def-456
credentials-file: /home/yourusername/.cloudflared/abc-123-def-456.json

ingress:
    # Main website
    - hostname: yourdomain.com
      service: http://localhost:8080

    # Blog subdomain
    - hostname: blog.yourdomain.com
      service: http://localhost:3000

    # Catch-all (required)
    - service: http_status:404
Run Cloudflare Tunnel🔗
Cloudflare Tunnel automatically runs as a service once configured. Start it with:
cloudflared tunnel run homeserver-tunnel
The tunnel will connect to Cloudflare and maintain the connection automatically.
Deploy a Test Website🔗
# Create a simple website
mkdir -p ~/website
echo "<h1>Hello from my homeserver!</h1>" > ~/website/index.html

# Run with Docker
docker run -d \
  --name website \
  --restart unless-stopped \
  -v ~/website:/usr/share/nginx/html:ro \
  -p 8080:80 \
  nginx:alpine
Visit https://yourdomain.com - you should see your page!
Step 9: Bonus Self-Hosted Applications🔗
Jellyfin (Media Server)🔗
Host your own Netflix for movies, TV shows, music:
# Install Jellyfin
curl https://repo.jellyfin.org/install-debuntu.sh | sudo bash

# Start Jellyfin service
sudo systemctl start jellyfin
sudo systemctl enable jellyfin

# Check status
sudo systemctl status jellyfin
Access:
- Locally:
http://homeserver:8096orhttp://192.168.1.50:8096 - Via Tailscale:
http://homeserver.tailnet:8096(from anywhere)
Setup:
- Open in browser
- Create admin account
- Add media libraries (point to your media folders)
- Enjoy your personal streaming service
Samba File Server (Network Drive)🔗
Turn your homeserver into a network attached storage (NAS):
# Install Samba
sudo apt install samba -y

# Create shared directory
mkdir -p ~/shared

# Configure Samba
sudo vi /etc/samba/smb.conf
Add at the end of the file:
[Shared]
   path = /home/yourusername/shared
   browseable = yes
   read only = no
   guest ok = no
   create mask = 0755
Create Samba user and start service:
# Set Samba password for your user
sudo smbpasswd -a yourusername

# Restart Samba
sudo systemctl restart smbd
sudo systemctl enable smbd
Access from other computers:
Windows:
- Open File Explorer
- Enter:
\\homeserver\Sharedor\\192.168.1.50\Shared - Enter credentials
macOS:
- Finder → Go → Connect to Server
- Enter:
smb://homeserver/Shared - Enter credentials
Linux:
# Mount permanently
sudo mkdir /mnt/homeserver
sudo mount -t cifs //192.168.1.50/Shared /mnt/homeserver -o username=yourusername,password=yourpassword
Now you have a network drive accessible from all devices on your home network.
Monitoring and Maintenance🔗
System Monitoring🔗
# Install monitoring tools
sudo apt install htop iotop iftop -y

# Check resources
htop          # CPU, RAM usage
iotop         # Disk I/O
iftop         # Network usage

# Check Docker
docker ps     # Running containers
docker stats  # Container resource usage
Log Monitoring🔗
# System logs
sudo journalctl -f

# Docker logs
docker logs -f website
docker logs -f jellyfin

# Cloudflared logs
sudo journalctl -u cloudflared -f

# Tailscale logs
sudo journalctl -u tailscaled -f
Automated Updates🔗
# Create update script
nano ~/update-system.sh
Content:
#!/bin/bash
# System update script

echo "Updating system packages..."
sudo apt update && sudo apt upgrade -y

echo "Updating Docker images..."
docker images --format "{{.Repository}}:{{.Tag}}" | grep -v "<none>" | xargs -I {} docker pull {}

echo "Pruning unused Docker resources..."
docker system prune -af

echo "Update complete!"
Make executable:
chmod +x ~/update-system.sh
Run weekly:
# Edit crontab
crontab -e

# Add weekly update (Sundays at 3 AM)
0 3 * * 0 /home/yourusername/update-system.sh >> /home/yourusername/update.log 2>&1
Backup Strategy🔗
Critical data to backup:
- Docker volumes:
~/jellyfin/config,~/website, etc. - Cloudflare tunnel credentials:
~/.cloudflared/ - System configs:
/etc/ssh/sshd_config,/etc/systemd/system/
Backup to external drive:
# Create backup script
nano ~/backup.sh
Content:
#!/bin/bash
BACKUP_DIR="/mnt/external-drive/backups"
DATE=$(date +%Y%m%d)

# Create dated backup folder
mkdir -p "$BACKUP_DIR/$DATE"

# Backup important directories
tar -czf "$BACKUP_DIR/$DATE/docker-volumes.tar.gz" ~/jellyfin ~/website ~/shared
tar -czf "$BACKUP_DIR/$DATE/cloudflared.tar.gz" ~/.cloudflared
tar -czf "$BACKUP_DIR/$DATE/configs.tar.gz" /etc/ssh/sshd_config /etc/systemd/system/*.service

# Keep only last 7 backups
ls -t "$BACKUP_DIR" | tail -n +8 | xargs -I {} rm -rf "$BACKUP_DIR/{}"

echo "Backup complete: $DATE"
Run daily:
chmod +x ~/backup.sh

# Add to crontab (daily at 2 AM)
crontab -e
0 2 * * * /home/yourusername/backup.sh >> /home/yourusername/backup.log 2>&1
Troubleshooting Common Issues🔗
Can’t SSH After Reboot🔗
Problem: Server IP changed or Tailscale not running
Solution:
# If you have physical access
sudo tailscale up

# Check IP
ip addr show

# Verify DHCP reservation is correctly configured on router
Cloudflare Tunnel Not Working🔗
Problem: Tunnel disconnected or misconfigured
Solution:
# Check tunnel status
sudo systemctl status cloudflared

# Restart tunnel
sudo systemctl restart cloudflared

# Check logs
sudo journalctl -u cloudflared -f
Docker Container Won’t Start🔗
Problem: Port conflict or volume issue
Solution:
# Check what's using the port
sudo netstat -tulpn | grep :8080

# Stop conflicting service or change port

# Check container logs
docker logs container-name
Server Running Hot🔗
Problem: Laptop overheating
Solution:
- Clean dust from vents and fans
- Ensure good ventilation
- Check CPU usage:
htop - Consider lowering CPU frequency:
sudo apt install cpufrequtils
sudo cpufreq-set -g powersave
Real-World Performance🔗
The site you’re reading runs on this exact homeserver setup. With proper configuration, old hardware can handle production workloads efficiently.
Performance characteristics:
- Page load time: 300-500ms (with Cloudflare CDN caching)
- Concurrent users: Can handle dozens of simultaneous visitors
- Uptime: High availability with proper maintenance
- Cost: $0 hosting (excluding optional domain)
Services running:
- Main website (static site generator)
- Tailscale (private access)
- Cloudflare Tunnel (public access)
- Samba file share
- Jellyfin (personal use)
Resource usage: Minimal CPU and RAM usage leaves plenty of headroom for additional services.
Security Considerations🔗
What We Did Right🔗
✅ No open ports - Zero attack surface on home network
✅ Encrypted access - Tailscale and Cloudflare Tunnel use strong encryption
✅ Zero Trust - Every connection authenticated
✅ Firewall enabled - UFW blocks unwanted traffic
✅ SSH hardened - Limited authentication attempts, no root login
✅ Regular updates - Automated system and container updates
What to Avoid🔗
❌ Port forwarding 22, 80, 443 - Direct exposure to bot attacks
❌ Weak passwords - Use strong, unique passwords
❌ Disabled firewall - Always keep UFW enabled
❌ Root access over network - Disable remote root login
❌ Outdated software - Keep everything updated
❌ Storing sensitive data unencrypted - Use encryption for backups
When NOT to Use a Homeserver🔗
Homeservers aren’t for everything:
Don’t use for:
- Mission-critical production apps (use redundant cloud)
- High-traffic public sites (CDN helps, but there are limits)
- Compliance-heavy industries (healthcare, finance) - complexity increases
- When you need 99.99% uptime SLAs
Perfect for:
- Personal websites and blogs
- Development/testing environments
- Learning and experimentation
- Personal cloud storage
- Media servers for home use
- IoT/smart home hubs
- Side projects and hobbies
Key Takeaways🔗
- $0 hosting is real - Reuse old hardware for production services
- Security through architecture - Zero open ports, encrypted tunnels, Zero Trust
- Two access patterns - Tailscale (private), Cloudflare Tunnel (public)
- DHCP reservation essential - Stable local IP for reliability
- Docker for isolation - Clean, manageable service deployment
- Lid behavior matters - Configure laptops to run closed
- Monitoring is critical - Watch logs, resources, uptime
- Backups save lives - Automate backups to external storage
- Learning by doing - Hands-on experience with production technologies
- This site is proof - The blog you’re reading runs on this setup
The mental model: Think of your homeserver as a production server that happens to be in your home. Treat it with the same care: security hardening, monitoring, backups, automation. The difference is you have complete control, zero recurring costs, and invaluable learning experience. The laptop you thought was obsolete is actually a powerful, versatile server that can host websites, media, files, and more - all while sipping electricity and operating silently in a corner of your home.
What’s Next?🔗
You now have a production-ready homeserver. Here are ways to expand:
More Services:
- Nextcloud (personal cloud)
- Pi-hole (network-wide ad blocking)
- Gitea (self-hosted Git)
- Bitwarden (password manager)
Related Topics:
- IP Addresses Fundamentals - Understanding network addressing
- Subnet Masks Explained - Network division
- MAC vs IP Addresses - Layer 2 vs Layer 3
The best part? You can experiment freely. It’s your hardware, your network, your rules. Break things, learn, rebuild. That’s how mastery develops.
Welcome to the world of self-hosting my friend. Your homeserver journey starts now.